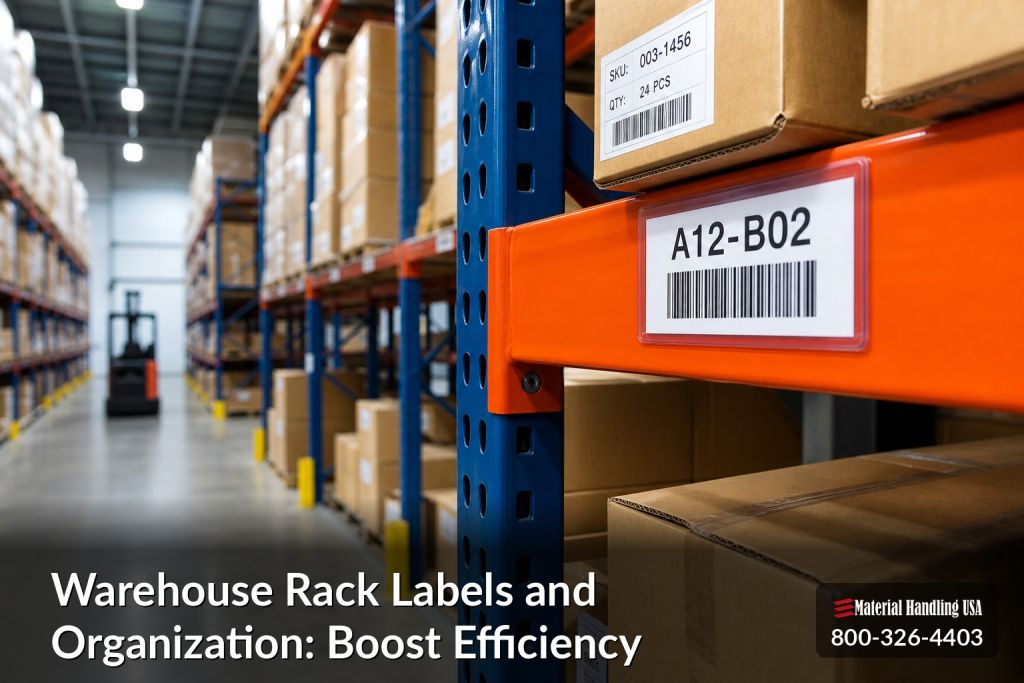
If your team keeps stopping mid-pick to confirm rack locations, the labeling system is already costing you time. The problem usually isn't effort. It's structure. A warehouse can have solid racking, trained staff, and a working WMS, yet still lose accuracy because labels are inconsistent, hard to scan, or disconnected from the established operational flow.
That's why warehouse rack labels and organization matter most when the building gets busy. New hires need to learn locations fast. Pickers need to trust what they scan. Supervisors need location logic that matches the digital map in the WMS. Safety teams also need load information and clear rack identification without turning every aisle into visual clutter.
A good labeling system does more than mark storage positions. It creates a single language for operations, inventory control, and compliance. In practice, the strongest systems are simple. They use a clear hierarchy, repeat the same placement rule on every bay, and make every location easy to read both with the eye and with a scanner.
Poor label discipline does the opposite. It creates hesitation, workarounds, and avoidable mispicks. In a live operation, those issues show up quickly in cycle counts, training friction, and audit headaches.
Introduction
A picker stops at bay B-14, scans the rack label, and gets a WMS exception. The label on the upright says one thing. The system says another. A supervisor gets called over, the pallet waits in the aisle, and a simple pick turns into a preventable delay.
That pattern shows up in warehouses that added locations over time without one labeling rule tied to one system record. The floor team works off what they can see. The WMS works off what was entered months or years earlier. Safety inspections add another layer, because rack identification, load notices, and location labels often end up posted separately with no shared logic.
Good rack labeling fixes more than wayfinding. It gives operations, inventory control, and compliance one location language. That matters in facilities using warehouse organization systems that need clear visual control at the rack and clean location data inside the WMS.
The practical standard is straightforward. Build rack labels from a fixed hierarchy such as Zone-Aisle-Bay-Level-Bin. Keep the same placement rule on every bay so pickers know where to look and scanners hit the code without wasted motion. Then make sure the printed location, the WMS record, and any required rack identification support the same naming logic. That is the part many guides miss, and it is usually where mispicks and inspection write-ups start.
I have seen the same issue in parts rooms, distribution centers, and mixed-SKU operations. Teams focus on getting labels printed, but the essential work is getting every label to serve three jobs at once: direct the picker, confirm the WMS location, and support safe rack use. The same discipline behind optimizing hardware stock for your business applies here. Clear location control reduces search time, cleanup work, and avoidable errors.
Prerequisites and Planning
A clean rollout starts before anyone prints a label. You need a naming convention, a rack map, and a realistic count of how many labels the project requires. Without that, teams usually reorder, relabel, or patch gaps later.
Start with the location structure
Build the address format first. For most operations, the best approach is a fixed hierarchy such as Zone-Aisle-Bay-Level-Bin. Keep the sequence consistent across the whole building. If your WMS already has location naming rules, use those rules as the master reference. Don't create a floor label format that “mostly matches” the software.
A few planning rules matter more than people expect:
- Use leading zeros: Write 01 instead of 1 so location fields align with WMS records and future expansion.
- Alternate field types when possible: Numeric and alphanumeric patterns are easier to separate visually and help reduce transposition errors.
- Choose one aisle logic: If your operation uses odd aisles on the left side and even aisles on the right, keep that pattern throughout the facility.
Audit the physical environment
The label material has to match the warehouse, not just the rack. In stable environments, adhesive laminated labels work well for permanent setups. In dynamic areas, magnetic labels make sense where locations change often. In cold storage, freezer-grade materials are the safer choice because temperature and humidity affect durability, as noted in this guidance on warehouse rack label material selection.
That same source also recommends a full scanner walk-through before deployment. Every label should scan correctly the first time and read back the exact location code shown on the label.
For teams tightening inventory control overall, this broader resource on optimizing hardware stock for your business is useful because it frames labeling as part of larger inventory discipline, not a stand-alone task.
Planning checklist before you order labels
Use this short checklist before printing anything:
- Map every rack line: Include active, reserve, overflow, and specialty storage.
- Confirm stakeholder input: Operations, safety, and IT should all approve the naming logic.
- Document label counts: Count bay labels, end-of-aisle signs, and any safety signage separately.
- Flag environmental zones: Identify freezer, washdown, dusty, or high-change areas.
- Test scanner compatibility: Verify barcode readability with the actual devices used on the floor.
- Review adjacent storage systems: If racks connect to shelving, parts rooms, or smaller stock areas, keep the naming logic aligned with your broader warehouse organization systems.
The best labeling projects don't begin with printers. They begin with a map and a naming standard that no one improvises later.
Implementation Steps
Once the plan is approved, rollout should follow a repeatable sequence. Don't let installers label ad hoc by aisle or by memory. Build the full code list, lock the format, and then install in a controlled pattern.

1. Generate location codes in the WMS
Create the complete location list in the WMS before label production. That prevents field edits after installation. Export the code list into a controlled file and check for duplicate locations, skipped bays, or inconsistent level names.
Treat the WMS as the source of truth. If the software says A-03-07-02, the printed label should say exactly that. No local shortcuts.
2. Design labels for both people and scanners
Every rack label should be readable from normal approach distance and scannable with your handheld devices. Human-readable text matters just as much as the barcode because staff still confirm locations visually.
Use strong contrast and clean spacing. Include only the information required for location confirmation. Avoid crowding the label face with extra notes that belong on separate signage.
3. Back up the naming file
This gets skipped too often. Keep at least one clean backup of the approved location file. If you ever migrate systems, reprint damaged labels, or expand the layout, that master file saves time and avoids naming drift.
4. Print and apply in a fixed sequence
Install aisle by aisle, starting from one consistent end. Apply labels in the same position on every bay. Don't let one crew put labels on beams while another uses uprights. Consistency matters more than installer preference.
A practical install pattern looks like this:
- Confirm aisle number and orientation.
- Apply the first bay label in the approved position.
- Continue bay by bay without skipping.
- Pause at regular intervals for spot checks.
- Mark any damaged surfaces or adhesion failures for immediate correction.
5. Verify and train before full go-live
After installation, walk each aisle with a scanner. Check that every label scans cleanly and that the returned code matches the printed code. Then train staff on the exact travel logic, scan sequence, and exception process.
Labeling transitions from merely visual to fully operational. If users don't know how the system is intended to work, they'll create shortcuts that weaken it.
A rollout table that keeps teams aligned
| Step | Main task | What to confirm before moving on |
|---|---|---|
| 1 | Build location codes | No duplicates, no missing bays, WMS alignment confirmed |
| 2 | Finalize artwork | Readable text, strong contrast, correct barcode format |
| 3 | Save backups | Approved master file stored and accessible |
| 4 | Install labels | Consistent placement, aisle sequence maintained |
| 5 | Verify and train | First-scan success, staff know new workflow |
Tools and materials most teams need
Some projects are simple. Others need more control because the warehouse stays active during installation. At minimum, plan for these items:
- Label stock: Adhesive laminated, magnetic, or other environment-matched material
- Barcode scanner: Use the same type your team uses during normal operations
- Lift access equipment: Needed for end signs or high-level visual markers
- Surface prep supplies: Dust and residue reduce adhesion
- Master location list: Printed and digital versions
- Installation markers: Temporary tags help crews avoid skipped bays
A rack labeling rollout should feel boring. If the crew is making decisions on the floor, too many decisions were left open during planning.
Material Selection and Label Placement Standards
A label system fails fastest in two places. The material does not survive the environment, or the placement does not match how people scan and how the WMS expects locations to appear. In live warehouses, those two mistakes also create safety problems because operators start hunting for addresses instead of confirming them in one glance.
Match the material to the environment
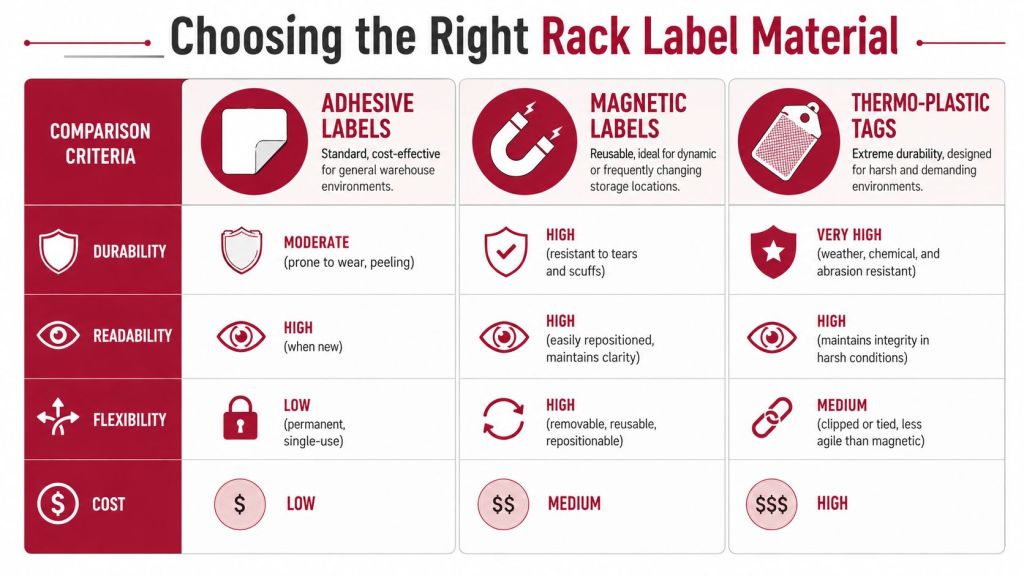
Choose label stock based on slot stability, surface condition, traffic, and exposure. Adhesive laminated labels work well for fixed rack addresses on clean, painted uprights. Magnetic labels fit reserve locations or forward pick slots that change during resets. Thermo-plastic tags earn their cost in freezer space, washdown areas, outdoor storage, or impact-prone zones where adhesive labels fail early.
The trade-off is simple. Flexible labels are easier to change. Permanent labels usually scan better over time and need less policing.
Use this quick comparison as a decision guide:
| Label type | Best use | Main trade-off |
|---|---|---|
| Adhesive laminated | Permanent rack locations | Harder to update once applied |
| Magnetic | Flexible and changing slots | Not ideal where labels get bumped often |
| Thermo-plastic tags | Harsh environments | Higher material cost and more hardware |
Printed quality matters as much as substrate. If the barcode symbology, text size, and human-readable fields do not match the WMS location format, the floor team ends up with labels that look fine but fail during receiving, replenishment, and cycle counts. For smaller storage areas, the same discipline applies to bins and shelving. This guide to labeling and bin location systems for efficient parts rooms shows how to carry one naming logic across mixed storage types.
Placement standard that reduces confusion
Set one placement rule and hold it across every aisle, bay type, and installer. A common standard is the left upright of each bay, placed at a readable eye-level zone that stays visible when product is in position. The exact height can shift slightly for the rack design, but the location should stay predictable for pickers, lift drivers, auditors, and scanner workflows.
That consistency does more than speed up visual search. It supports WMS confirmation logic because operators learn one scan point for every address, and it supports safety compliance because location IDs stay visible during inspections, damage reviews, and emergency product trace checks.
Keep the face of the label clear of beam shadows, stretch wrap, and overhang. If pallets regularly block the primary label, add a secondary marker such as end-of-aisle signage or higher-level identifiers instead of letting crews improvise placement bay by bay.
Key specifications to follow
- Use one upright location only: Pick one side and keep it there across the building.
- Place labels in a readable band: Eye-level placement improves confirmation speed and scan success.
- Keep code fields in one order: Zone, aisle, bay, level, and position should always print the same way the WMS stores them.
- Build for inspection visibility: Labels should remain readable during rack checks, fire lane reviews, and inventory audits.
- Protect contrast and quiet space: Crowded layouts, weak contrast, and oversized logos reduce scan reliability.
- Choose attachment methods that fit the risk: In high-contact areas, a stronger holder or rigid tag often outperforms standard adhesive stock.
Good label design is usually plain. The same rule shows up in Quote My Wall's name label advice. Clarity beats decoration, especially where operators need to read and scan fast.
Common Mistakes and Troubleshooting
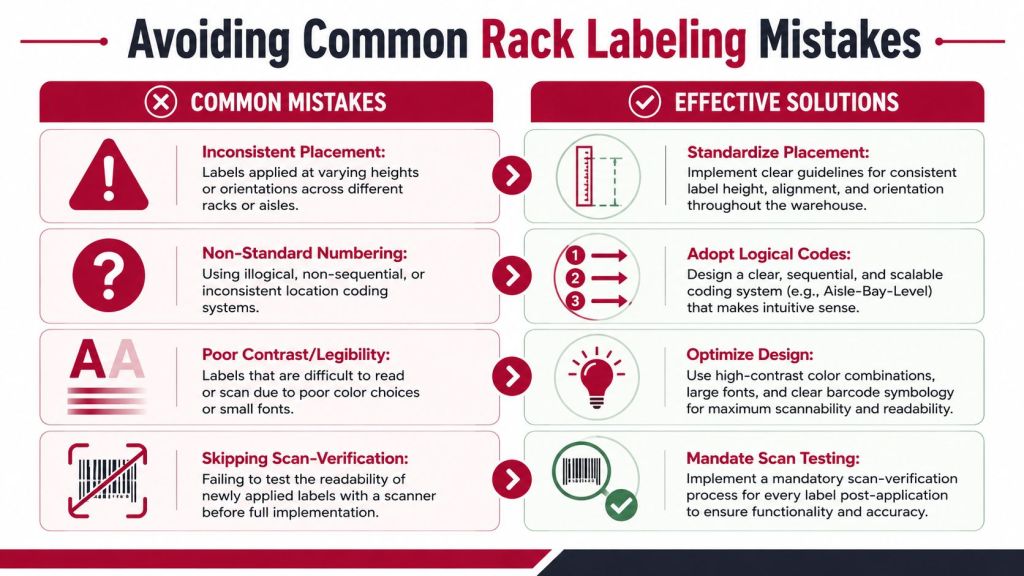
Second shift starts a pick wave, and the first delay shows up in aisle three. One picker scans the left upright. The next reaches to the right because that row was labeled by a different crew. A third key-enters the location because stretch wrap is covering the barcode. By lunch, the problem looks like labor drag, but the root cause is label logic that no longer matches the way the building runs.
Mistakes that cause the most disruption
The biggest failures usually come from drift. A facility starts with one placement rule, one numbering format, and one scan method. Then expansions, damage replacements, and quick fixes introduce exceptions. Operators work around them, but the WMS does not. That gap is where mispicks, recounts, and blocked investigations start.
Inconsistent placement is a common example. This review of common warehouse rack labeling pitfalls notes that left versus right side variability increases lookup time and mispick risk. It also points out that labels placed too high or blocked by product reduce scan performance. In practice, the problem is bigger than speed. During cycle counts, incident reviews, or safety inspections, teams lose time confirming whether the physical label, the WMS address, and the rack position still match.
Weak numbering logic creates a different kind of trouble. Mixing 1 with 01, changing level conventions by aisle, or adding ad hoc suffixes may look harmless on the floor. It creates downstream friction in slotting, training, replenishment rules, and report filtering. I see this most often after a layout change where physical rack edits were made faster than the location master was cleaned up.
A separate mistake is treating safety and inventory labels as unrelated systems. If load signage, rack IDs, and WMS location labels compete for the same space, crews start placing tags wherever they fit. That usually leads to blocked capacity signs, unreadable location IDs, or labels hidden during inspections.
Fast fixes that usually work
Start with the exceptions, not the whole building. Walk the highest-error aisles, compare each physical label to the WMS location table, and mark every mismatch in one pass. If the same issue repeats, it is a standards problem, not a one-off install problem. This is the same discipline used in many warehouse optimization assessments where labeling, slotting, and scan workflow have to line up.
Then correct in this order:
- Fix placement drift first: Put every active location label back in one approved position so pickers stop hunting for the scan point.
- Repair the data structure next: Standardize leading zeros, level names, and position codes so the printed label matches the WMS exactly.
- Remove visual interference: Replace damaged holders, cut back obsolete stickers, and clear any barcode blocked by wrap, straps, or overhang.
- Test with real tasks: Run picks, replenishment scans, and cycle counts after changes. A label that scans in a static test can still fail in live traffic.
- Check compliance visibility: Confirm that location IDs and safety markings remain readable from normal working positions during inspections and rack reviews.
Good troubleshooting is usually plain and disciplined. Quote My Wall's name label advice applies here too, because legibility, consistent formatting, and fit-for-use materials matter in any labeling system.
If a picker has to stop and interpret the label, the system is already costing time.
Operational Support Advice
A rack labeling project usually looks straightforward until the first live shift after go-live. Pickers start scanning the wrong beam level, replenishment drivers cover location IDs with pallets, and a safety walk finds capacity signs that are technically installed but hard to read from normal working positions. That is why operational support has to cover more than label installation. It has to connect location control, WMS behavior, and compliance visibility.
Safety and compliance need their own plan
Load capacity marking should be planned alongside location labeling, not added after the racks are full. Facilities regularly run into inspection problems when labels or signs are mounted too high, blocked by product, or scattered across the rack in ways that force employees to hunt for the right information. The fix is a clear sign hierarchy.
In many facilities, the cleanest approach is to separate functions by viewing distance. Put location labels where pickers and lift operators scan them during work. Put rack capacity and safety information on end-of-row signs or other fixed sign points where supervisors, operators, and inspectors can read them without guessing. That reduces visual clutter on the pick face and lowers the chance that one label system interferes with the other.
The key trade-off is space. The more information you try to force onto each rack opening, the harder it becomes to keep every label readable, scannable, and compliant.
DIY versus professional support
Internal teams can handle some projects well, especially in smaller buildings with a stable slotting plan and a WMS naming structure that is already clean. The risk is not usually printing labels. The risk is managing all the dependencies at once: rack elevations, install timing, scanner testing, traffic flow, and safety sign placement.
| Option | Cost Range | Timeline | Best For |
|---|---|---|---|
| DIY internal rollout | Varies by label volume, labor, and rework risk | Depends on staff availability and operating schedule | Small facilities with simple layouts and strong internal controls |
| Hybrid approach | Varies by scope and outside design support | Faster planning, internal install pace still varies | Teams that want expert structure but keep labor in-house |
| Professional design and installation support | Varies by project complexity and facility size | Often easier to schedule in phases with fewer floor decisions | Multi-aisle projects, WMS alignment, compliance-sensitive environments |
Hybrid support is often the best value. An outside team sets the address logic, placement standards, and sign schedule. The internal team handles installation in phases around production demands.
When outside help makes sense
Outside support usually pays for itself under a few conditions:
- The facility is re-slotting or expanding. Layout changes are the best time to fix naming standards, scan positions, and safety sign locations before bad habits get locked in.
- The WMS location table needs cleanup. If printed labels, scan logic, and system addresses do not match exactly, field labor turns into rework.
- The project includes compliance signage. Capacity signs, aisle IDs, and location labels should be designed as one system so operators and inspectors see the same structure.
- Internal labor is already committed. Label projects stall fast when supervisors are trying to fit install work between receiving spikes, cycle counts, and daily shipping.
For teams planning a broader workflow review, warehouse optimization support helps tie rack labeling decisions back to slotting, travel paths, replenishment logic, and scan discipline. Warehouse Bridge’s guide to reducing warehouse travel time is a useful companion when a team is using actual pick patterns to review travel distance and slotting priorities.
One timing rule holds up across almost every project. Install the standard before the rack system is full. Once inventory is in place, every correction takes longer, requires more lift time, and creates more chances for pick errors during the transition.
Conclusion and Next Steps
Warehouse rack labels and organization work best when they're treated as part of the operating system of the building. The strongest results come from a clear address hierarchy, consistent placement, environment-matched materials, and a full scanner verification process before go-live.
The trade-offs are straightforward. Simple, standardized systems are easier to train, easier to scan, and easier to expand. Inconsistent systems create hesitation, inventory drift, and unnecessary audit problems. Safety marking also has to be planned with the same discipline, especially when load capacities and pick visibility compete for space.
If your facility is adding racks, reorganizing inventory, or trying to clean up pick accuracy, it's usually better to settle the naming standard now rather than relabel around avoidable mistakes later. Better planning gives you more flexibility on layout, installation timing, and future growth.
Request a Quote for a free layout discussion, or Contact Us to review your storage plan before you order. If you already know what you need, call (800) 326-4403 and move the project forward with clearer specs and fewer surprises.
Material Handling USA helps teams plan and equip better storage systems with competitive pricing, fast shipping and delivery, quality materials, free layouts and designs with no obligation, and free quotes. To start your project, Contact Us, Request a Quote, or Call (800) 326-4403. If you're ready to purchase related storage and facility products online, you can also explore the MH-USA store and Buy Online.